

When stepping into the world of flight simulation, getting a grip on some key performance metrics can make your experience smoother and more enjoyable. First, let’s talk about FPS, or frames per second. This is basically how many frames or images your game can display each second. A higher number generally means smoother gameplay.
Then there are CPU and GPU frame-time readings. In X-Plane 11, these readings can help show whether the CPU or GPU is taking longer to process each frame. Looking at these numbers alongside FPS can provide more information than FPS alone.
Your GPU handles much of the graphical workload, including scenery, aircraft, lighting, and other visual details. The CPU also has an important role in calculations involving the simulator, aircraft, and scenery. Monitoring the performance readings can help show which part of the system is under greater pressure during a test.
Understanding these metrics isn’t just about numbers. It’s also about seeing when and where performance changes. Graphics settings, aircraft complexity, airport scenery, and the number of world objects can all affect the results. By comparing these factors under similar conditions, I can get a better idea of what my laptop can handle.
For more context, I compared playable FPS vs comfortable flying in flight simulators, because a higher FPS number does not always tell the whole story about how smooth the simulator feels.
Setting Up Your Flight Simulator for Benchmarking
To get meaningful benchmarking results, setting up the flight simulator environment consistently is important. For these tests, I used X-Plane 11 on my Lenovo IdeaPad Slim 3 with an AMD Ryzen 7 5825U, 16 GB RAM, and integrated Radeon graphics.
I used JFK International Airport as an example because it is a large and detailed airport that can put more pressure on my hardware. I also kept the weather and time of day consistent so that changing conditions would not have as much influence on the comparison.
Consistency is the magic word here. During my tests, aircraft were kept stationary to maintain uniformity across all runs. Switching between cockpit and exterior camera views can help mimic different in-game perspectives without skewing the performance metrics.
During the tests, I kept the aircraft stationary while recording the performance readings. This made it easier to compare different graphics settings without movement around the airport changing the workload.
I tested both the Boeing 737-800 and Cessna 172. Using two different aircraft allowed me to see whether aircraft complexity also affected performance under similar conditions.
Keeping the test reasonably consistent made the comparisons more useful because I could focus on how the aircraft and graphics settings affected FPS and the CPU/GPU frame-time readings.
Conducting the Benchmark Test: Step-by-Step Guide
I tested the Boeing 737-800 and Cessna 172 using High, Medium, and Low graphics settings. One of the settings I compared was World Objects, which changes how much scenery and how many objects X-Plane displays.
For each test, I recorded the FPS along with X-Plane’s CPU and GPU frame-time readings. I also took screenshots of the settings and performance information so I could compare the results afterward. If performance feels inconsistent, I also documented my experience in an X-Plane 11 stuttering and FPS guide for budget laptops.
In another test, I looked at how to balance visual quality and FPS on a low-end PC, comparing how different graphics levels affected both performance and appearance in X-Plane 11.


I then repeated the test using Medium and Low settings with the Boeing 737-800.


I then tested the Boeing 737-800 at JFK with Number of World Objects set to Low and Reflection Detail set to Low, while recording FPS and CPU/GPU frame-time readings.


I followed the same process with the Cessna 172 so that I could compare a smaller aircraft with the Boeing under similar conditions.
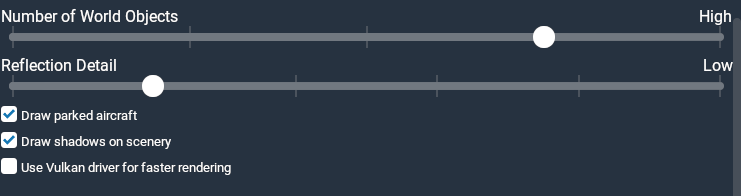



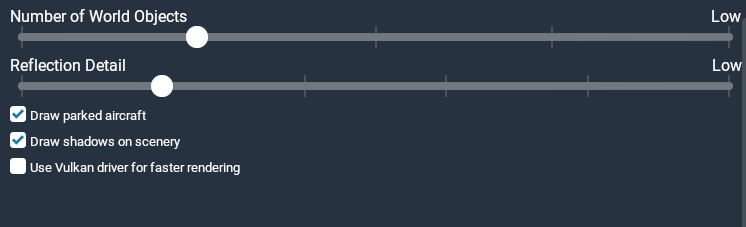

Keeping records of each run was useful because small FPS differences can occur between tests. Instead of relying on one number alone, I could look at the general performance range and compare it with the CPU and GPU frame-time readings.
Analyzing and Interpreting the Results
Once the tests were complete, I compared the results from both aircraft and the different graphics settings.
Benchmark Results
| Aircraft | World Objects | FPS | CPU | GPU |
| Boeing 737‑800 | High | 21.239 | 0.0232 | 0.0311 |
| Boeing 737‑800 | Medium | 25.298 | 0.0195 | 0.0248 |
| Boeing 737‑800 | Low | 23.485 | 0.0224 | 0.0235 |
| Cessna 172 | High | 27.121 | 0.0158 | 0.0229 |
| Cessna 172 | Medium | 25.365 | 0.0182 | 0.0215 |
| Cessna 172 | Low | 27.689 | 0.0148 | 0.0200 |
The Cessna 172 generally produced higher FPS than the Boeing 737-800 during my tests. With the Cessna, I saw FPS readings in roughly the mid-to-upper 20s in several of the runs, while the Boeing generally stayed lower, around the low-to-mid 20s in comparable tests.
This showed that aircraft choice can affect performance even when the airport and other testing conditions remain similar.
The World Objects tests also gave me an interesting result. Lowering the setting did not always produce a large FPS improvement. In some tests, Medium and Low were relatively close. This showed me that setting everything to the lowest value does not automatically guarantee a noticeable performance gain.
I would not assume that Medium is inherently more efficient than Low based on one benchmark. Small differences can come from normal variation between runs. What mattered more to me was whether the difference was large enough to notice during actual flying.
The CPU and GPU frame-time readings also helped me interpret the results. Instead of looking only at FPS, I could see how long each component was taking to process a frame and whether one side appeared to be placing a greater limit on performance.
At a detailed airport such as JFK, the combination of airport scenery, aircraft complexity, and graphics settings can place a significant load on integrated graphics. That makes it a useful location for comparing how different settings affect my particular laptop.
Practical Tips for Benchmarking and Improving Simulator Performance
One thing I learned from these tests is that benchmarking should be done under consistent conditions. Changing the aircraft, airport, weather, camera position, and graphics settings all at once makes it much harder to know what actually caused the FPS difference.
It also helps to test more than one graphics level. High, Medium, and Low settings can produce different results, but the difference between Medium and Low may sometimes be smaller than expected.
Aircraft choice matters as well. In my testing, the Cessna 172 generally performed better than the Boeing 737-800. That does not mean every smaller aircraft will always perform better, but it shows why aircraft type should be considered when benchmarking a flight simulator.
Detailed airports can also affect the results. A large airport such as JFK provides a more demanding test than a simple rural airport, so performance numbers from one location may not represent what you will see everywhere else.
Most importantly, I don’t look only at the highest FPS number. I compare FPS, CPU and GPU frame-time readings, settings, aircraft, and how the simulator actually feels. That gives me a more useful picture of performance than relying on a single benchmark figure.
Frequently Asked Questions
What should I measure when benchmarking X-Plane 11?
I look at FPS together with X-Plane’s CPU and GPU frame-time readings. FPS shows how smoothly the simulator is running, while the frame-time readings give me more context about how the system is handling each frame.
Should I test more than one graphics setting?
Yes. I tested High, Medium, and Low settings because the lowest setting did not always give a major FPS advantage over Medium. Testing several levels gives a clearer picture of what actually works best on the hardware.
Does aircraft choice affect FPS?
In my testing, yes. The Cessna 172 generally produced higher FPS than the Boeing 737-800 under similar conditions. That showed me that aircraft complexity can affect performance, not just the graphics settings.
Is Low always better than Medium for performance?
Not necessarily. In some of my tests, Medium and Low were fairly close in FPS. That means lowering a setting does not automatically guarantee a noticeable improvement.
Why did I use JFK for benchmarking?
I used JFK International Airport because it is a large and detailed airport that gives my laptop a more demanding test. That makes performance differences easier to notice than they might be at a simpler airport.
Why is consistency important when benchmarking?
Keeping the same airport, weather, aircraft position, and similar test conditions makes the results easier to compare. If too many things change at once, it becomes harder to know what actually caused the FPS difference.
Is FPS the only thing that matters?
No. I also pay attention to CPU and GPU frame-time readings and how the simulator actually feels. A benchmark is more useful when it reflects real flying conditions instead of focusing on one number alone.
Can benchmark results vary between PCs?
Yes. My results are specific to my Lenovo IdeaPad Slim 3 with a Ryzen 7 5825U, 16 GB RAM, and integrated Radeon graphics. Different hardware can produce different results even with the same simulator settings.
What I Learned From Benchmarking X-Plane 11
Benchmarking X-Plane 11 on my laptop showed me that performance depends on more than one setting. Aircraft complexity, world objects, airport scenery, and graphics quality can all influence the result.
The Cessna 172 generally gave me higher FPS than the Boeing 737-800, while changing World Objects from Medium to Low did not always produce a major improvement. That was a useful reminder that the lowest setting is not automatically the best choice.
For me, the most useful approach is to test different settings under the same conditions, record the results, and then decide whether the visual difference is worth the performance cost.
This is one reason I compare flight simulator system requirements with real-world performance, because meeting the listed requirements does not always show how the simulator will actually behave in demanding situations.
A benchmark is most valuable when it reflects the way you actually use the simulator. Rather than chasing one ideal FPS number, I use the results to find settings that give me a balance between visual quality and smooth performance on my hardware.