
Before starting a DIY flight simulator cockpit, it’s important to be clear on what you’re actually building and why. Whether the goal is training, improving flight skills, or simply enjoying a more immersive setup, that decision will directly affect the complexity of the build, the type of equipment you choose, and how much you’re willing to invest. For a broader perspective on how simulators are used in structured training, you can explore Aligning Sim Training With Aviation Regulations – What Sim Instructors And Pilots Need To Know.
Space is another factor that directly shapes your setup. A dedicated room allows for a more complete cockpit layout, while a smaller space may require a compact and efficient design. The available area will influence everything from equipment size to how your controls and displays are positioned.
Deciding whether you’re going all out or just starting small helps keep everything focused. Starting simple can save you some bucks and lets you ease into more complex setups over time. Aiming for the stars with a massive project right from the get-go might not be a great idea if you’re new to this, trust me!
Budgeting isn’t only about dollars but also about time and commitment. Building from scratch versus buying components depends on what you value more: hands-on creation or cutting down setup time.
In a nutshell, mapping out your purpose and space drives your DIY flight simulator adventure. Make these decisions early on to set yourself up for success and a simulator that’s a perfect fit for your needs.
Selecting the Right Aircraft Type and Simulation Platform
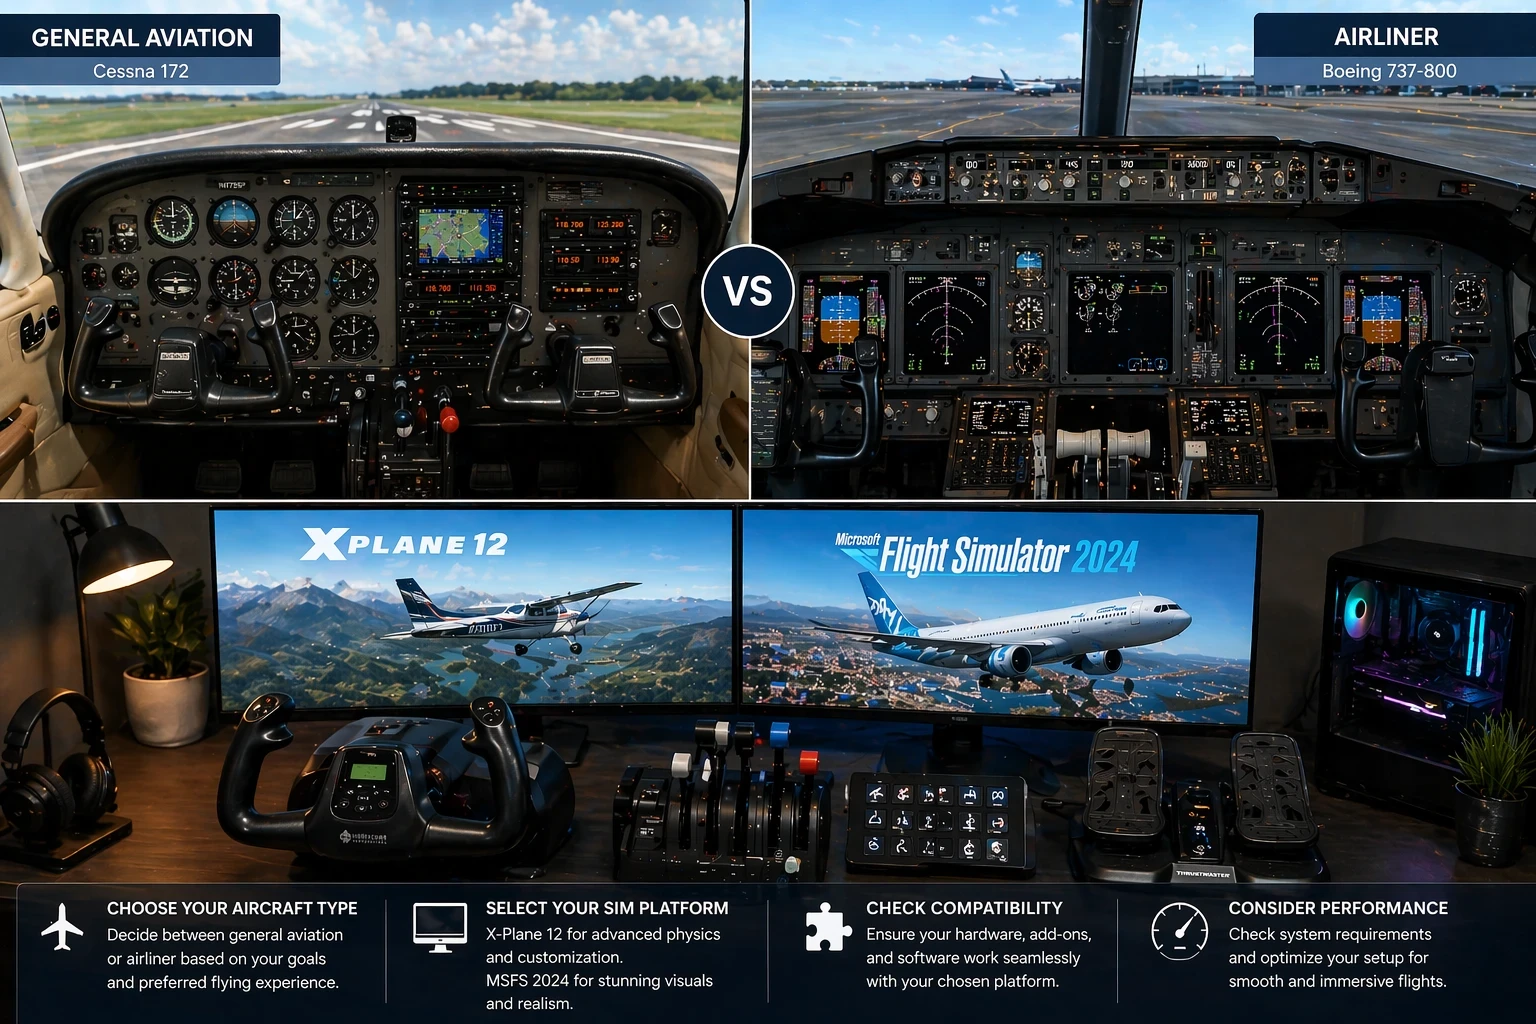
Choosing an aircraft type early helps keep the setup consistent. Focusing on one category, such as general aviation or airliners, prevents layout conflicts and simplifies control configuration. Each type has different requirements, so selecting one that aligns with your goals keeps the build more efficient and easier to manage.
Once you know what you’ll be flying, dive into the simulator software. It’s a major decision because your whole virtual experience revolves around it. X-Plane 12 and Microsoft Flight Simulator 2024 are favorites out there. X-Plane is all about customization, letting you tweak to your heart’s content. On the other hand, Microsoft Flight Simulator wows with its stunning visuals. If you want a deeper breakdown of how these platforms compare in performance, visuals, and realism, this external comparison is worth reviewing
Compatibility is key. Not every hardware piece will play nice with your chosen sim. Double-check compatibility for plugins, integrations, and all other tech tweaks. Nothing worse than getting a shiny piece of gear only to find it’s not a team player.
The software choice also impacts performance demands. A visually rich sim might look amazing but need serious computing power. Check your rig’s performance before adding super fancy bits. A general overview of system requirements and setup considerations can also be helpful when planning upgrades
Before splashing out, invest time in demos and free trials. They give you a taste without the hefty price. Understanding the feel and flow beforehand helps ensure all the new gear gels beautifully with your setup. Miss this step, and you could end up with mismatched tech or unnecessary costs.
In short, steer your simulator’s ship with care. This choice affects not only your experience but also the setup’s overall cohesiveness and function.
Prioritizing Essential Control Hardware for an Effective Setup
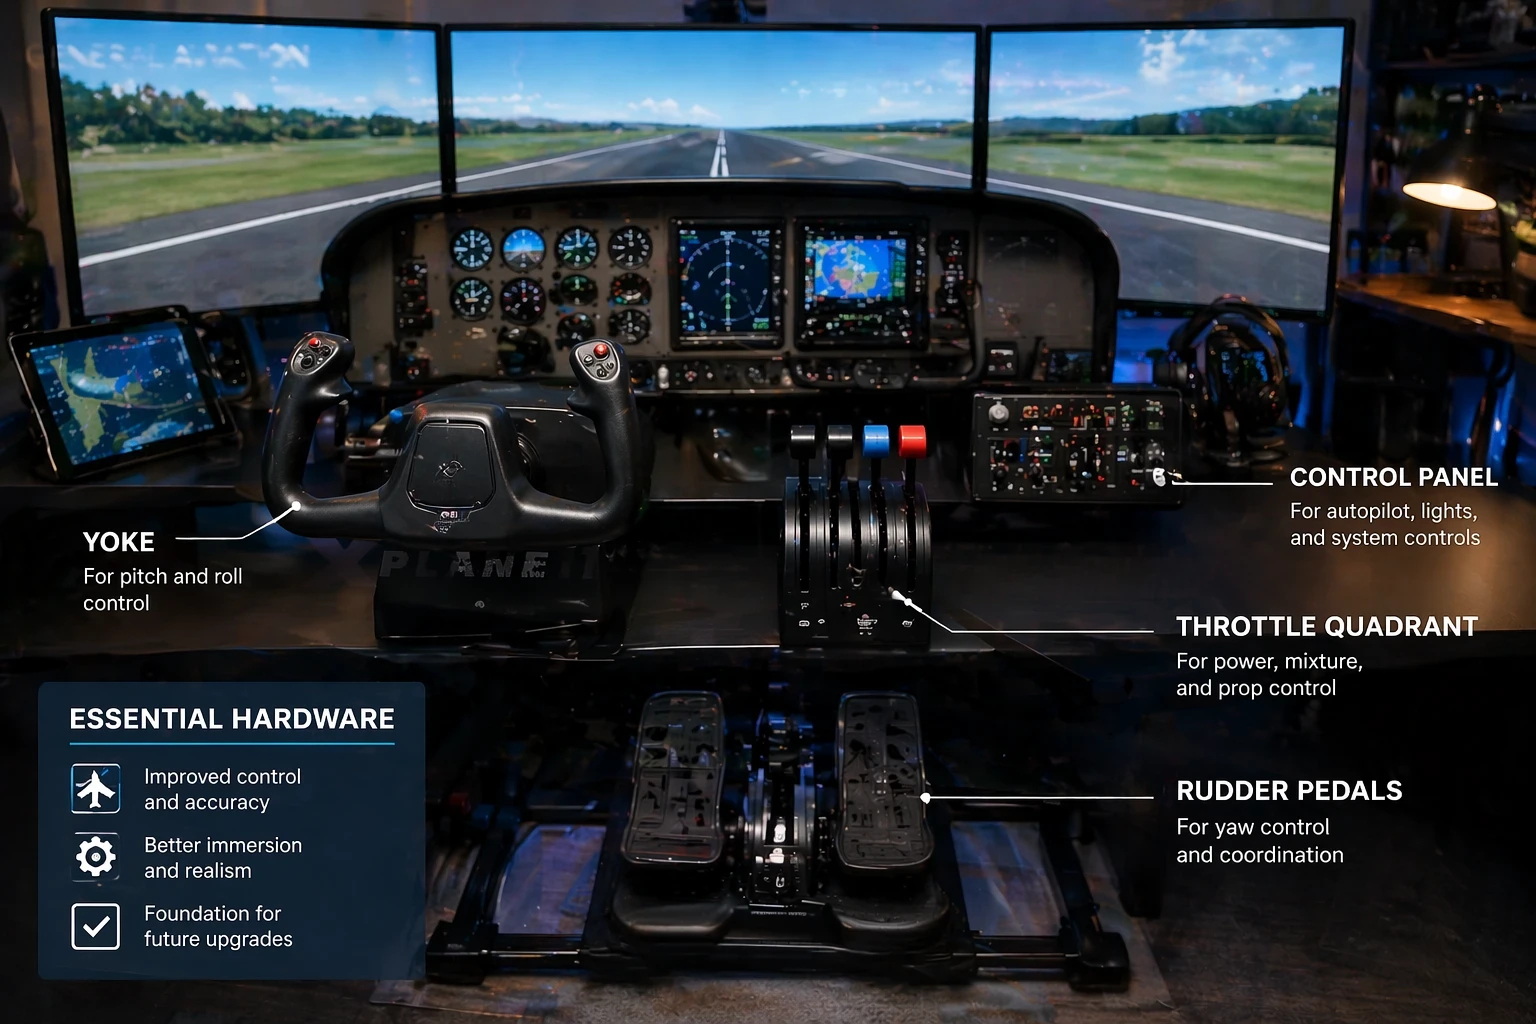
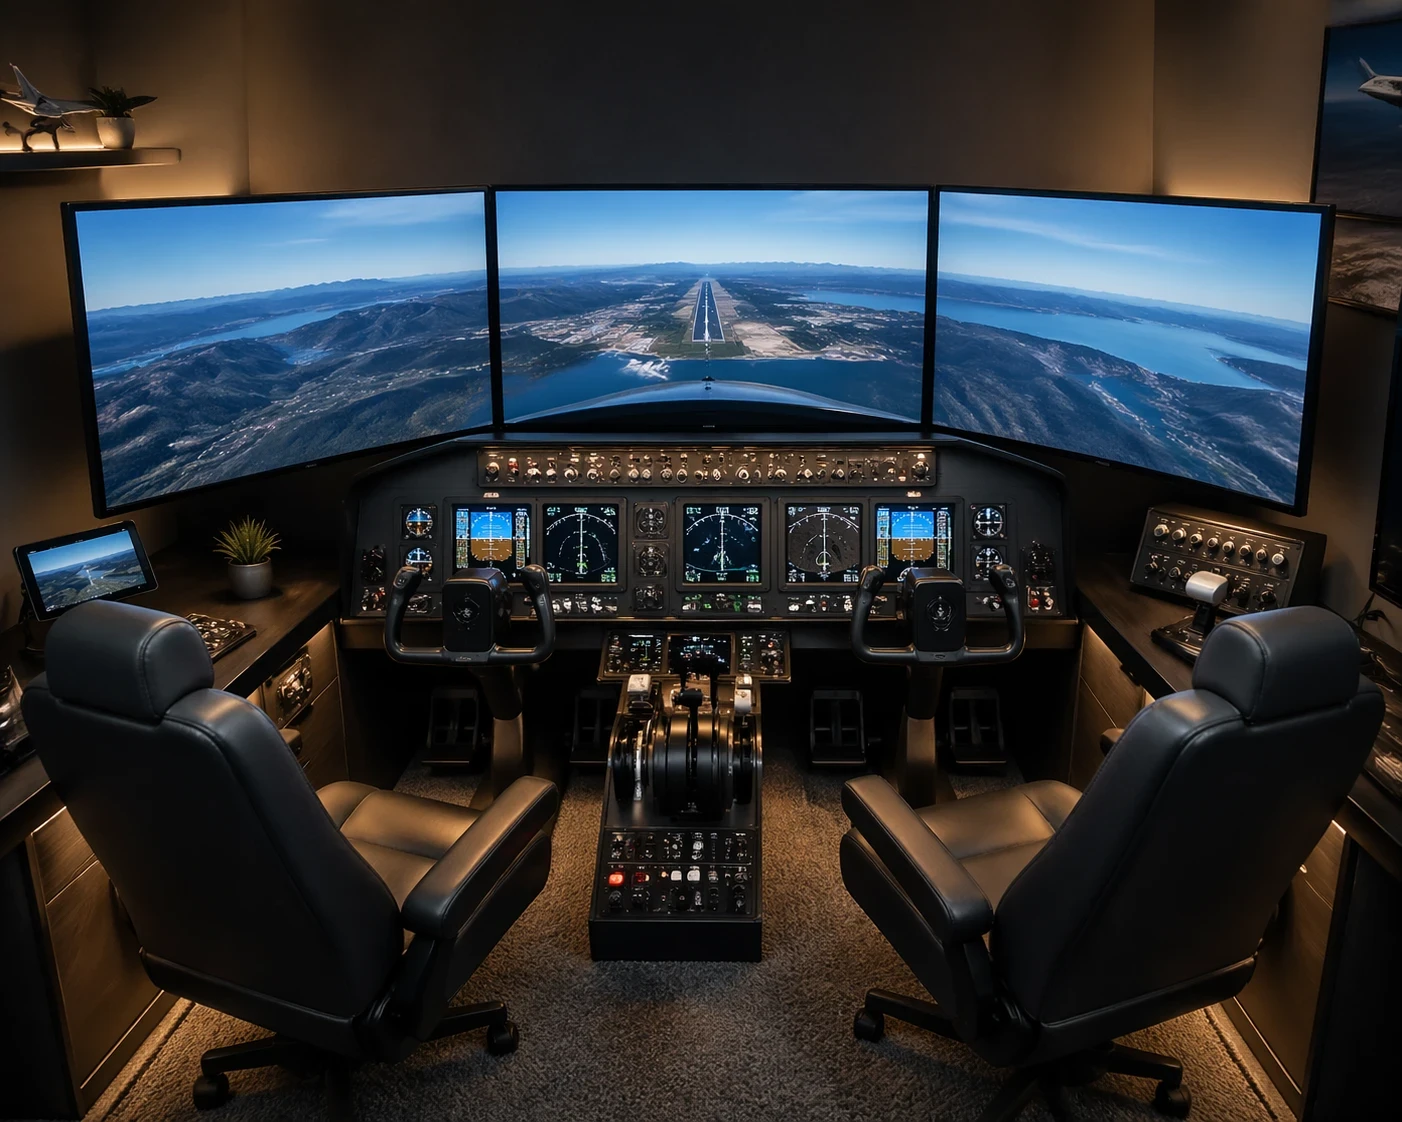
Control hardware plays a central role in how the simulator performs. While visual elements improve immersion, it’s the controls that directly affect how the aircraft responds during each phase of flight. Investing in a solid set of basic controls like a yoke or joystick, throttle controls, and rudder pedals means you’re focusing on the real essentials, avoiding distractions from the core experience.
For beginners, starting with a basic setup is smart. You don’t need to break the bank to get something that’ll vastly improve your flight experience. Good entry-level gear often offers the perfect mix of price and functionality. There’s no shame in going simple initially—it’s about mastering the basics before decking out your setup.
Keep an eye out for deals and bundles, as they can save some serious bucks when getting that initial gear ready. It’s also worth exploring second-hand options—plenty of sim enthusiasts regularly upgrade their gear, meaning there are deals to be had on perfectly solid gear.
While it might be tempting to splurge on the shiniest controls with the most buttons, remember that simplicity can also mean effectiveness. For instance, a decent joystick with enough inputs can often serve similarly to more complicated setups, giving you the functionality without overwhelming. If you’re planning to expand later, understanding how to customize and enhance your setup can help, as explained in How To Mod Your Flight Simulator For Unique Experiences.
Ultimately, by focusing on solid, reliable controls, you set a strong foundation for your cockpit. When the time comes to upgrade or add more complexity, you’ve already got that rock-solid start you’re building on, ensuring everything works seamlessly together.
Constructing a Modular and Flexible Setup Gradually
Building the cockpit gradually using a modular approach helps reduce cost and complexity. Instead of committing to a full setup immediately, adding components step by step allows for better flexibility and easier adjustments over time. Starting with essential panels like an autopilot or radio stack lets you enjoy the ride while keeping things open for upgrades.
Each component you add should serve a unique purpose, helping to streamline your workflow and boost efficiency. Assembling modular panels over time allows experimenting with layouts until you find what vibes best with your flying style.
You won’t need to rush into building an intricate replica of a cockpit. Many enthusiasts start with simple structures or even DIY materials like plywood to create their panels. It’s the craftsmanship and personalization that make it yours, not necessarily the material.
When you’re adding components, look into their dimensions and power requirements. Space constraints mean sometimes opting for more compact or multifunctional hardware. Plus, since modular panels tend to be smaller, it’s easier to focus on quality than when trying to build an entire cockpit at once.
Being patient and adding complexity at your own pace eliminates the pressure of getting everything perfect. Each new piece brings new capabilities, helping transform your setup to accommodate increasingly realistic simulation needs. By keeping it modular, you avoid lock-ins that could stifle creativity or complicate future improvements.
Balancing Performance, Space Optimization, and Usability
Performance should always be considered when expanding a cockpit setup. Adding too much hardware or too many add-ons can reduce stability, so focusing on a balanced configuration helps maintain smooth operation.Prioritizing what your system can handle keeps everything running like butter.
Now let’s chat about space. Think smart and use every bit wisely. Modular setups give some extra leeway. For example, stackable components or wall mounts help if you’re short on real estate. Try mapping out where everything will go before you start buying, so you’re not cramming stuff in or tripping over it every time you get in for a session.
Ergonomics is a key player too. Positioning your gear and screens within arm’s reach and eye level will mean less strain and more hours enjoying flights. Tiny tweaks in your setup can greatly increase comfort, letting you focus on piloting instead of discomfort.
While a fancy look can make your cockpit Instagram-worthy, it’s the usability that counts. Functionality should lead. Make a checklist of what’s most important for you in a session, and let that guide where your resources go. A well-designed layout trumps flashy extras every time. Throw in a comfy seat, and you’re set! If you’re also looking for ideas on what to actually fly once your setup is ready, exploring Exploring The World’s Iconic Aviation Routes From Home – Navigation, Weather, And Planning can give you practical scenarios to test your build.
Keeping performance, space, and usability in sync sets the stage for a fantastic sim adventure. Tackle challenges mindfully, and soon you’ll enjoy a cockpit that’s tailor-made for your flight journeys.
✈️ Build Smart Before You Build Big
A DIY flight simulator cockpit doesn’t need to be expensive or overly complex to be effective. Starting with a clear plan, focusing on essential controls, and building gradually will give you a setup that actually works without unnecessary cost or frustration.
If you’re looking to keep things affordable while still getting a solid experience, you can explore practical ideas and step-by-step approaches in Building a DIY Flight Simulator Cockpit on a Budget – Affordable Setup Guide, which focuses on cost-effective hardware choices and simple layouts that still deliver a realistic feel.
🔧 Take The Next Step With Your Setup
Once the basics are in place, improving your cockpit becomes much easier. Instead of rushing into expensive upgrades, refining your layout, controls, and overall setup will often give better results.
A budget-focused build can still evolve into a highly capable cockpit over time—especially when each upgrade is intentional and based on what you actually need during your flight sessions.
🚀 Keep It Practical and Expand Over Time
The best setups aren’t built all at once. They grow gradually with better decisions, smarter upgrades, and a clear understanding of what works.
Starting with a budget-friendly cockpit gives you flexibility, reduces risk, and allows you to improve your setup step by step without overcommitting early on.