
Flight sim equipment can actually look impressive when it’s not hidden away like a side hobby. Yokes, throttles, and pedals aren’t just tools—they can become part of your setup visually. If they’re placed properly, they start to feel more like functional pieces of the room rather than something you pack away after each session.
Setting up your gear doesn’t have to mean clutter. What makes the biggest difference is keeping things clean and visible so it actually resembles a small cockpit. A simple desk or stand is enough—as long as everything is positioned properly and easy to reach. From my experience, even basic gear looks better when it’s organized instead of spread out randomly. If you’re just getting started or refining your setup, you can find practical tips in this guide: How To Start Flight Simulation On a Low-End or Mid-Range PC (Beginner Guide).
Using shelves or a small cabinet can make a big difference when your gear isn’t in use. A dedicated spot for your joystick or throttle makes it feel more intentional instead of something left on the desk. It also helps keep your main space clear, especially if you’re switching between flying and other tasks.
Pair your equipment with aviation-themed furniture and decor to enhance the overall atmosphere. This can include sleek chairs designed to resemble pilot seats or simple touches like a metal desk that echoes the surface of an aircraft. These elements can subtly blend your passion for flight simulation with a sophisticated decor aesthetic. For real-world cockpit inspiration and layouts, you can explore resources like Experimental Aircraft Association.
Remember, the goal is to make your gear part of the room’s story. You don’t just want it to take up space. Let it shine, show it off, and let the world see your love for aviation—front and center.
Transforming Small Spaces into Aviation Cockpits

Making a flight sim setup the centerpiece of your room is totally doable, even if you’re working with a small space. It’s all about being smart with your layout. Use space-saving furniture that looks great but doesn’t take over. This way, you can create a cockpit feel without sacrificing half your living room.
Consider investing in modular furniture that allows for flexible configurations. A simple folding desk or a sleek wall-mounted setup can go a long way in keeping things neat and functional. Trick people into thinking you’ve got more room than you do by capitalizing on every inch wisely.
A cozy cockpit can be yours by incorporating little design tricks, like using tall bookshelves to store gear or decorative baskets for hiding cables and small accessories. Stackable storage or rolling carts tucked under the desk work wonders when floor space is at a premium.
Even small home offices or corner nooks can become mini flight decks with careful planning. Incorporating built-in storage or floating shelves can not only save floor space but elevate the entire aesthetic vibe of the room. To take realism a step further especially with add-ons and tools, this breakdown can help: Flight Simulator Add-Ons: What They Are and How They Improve Realism.
Take inspiration from real-life examples and setups found online. Many sim enthusiasts have taken the plunge to make efficient, compact spaces that don’t skimp on style. Check out forums and social media groups to see what others are doing with similar spaces.Communities like AVSIM can give you real setup ideas from other simmers. It’s about crafting a spot that’s uniquely yours, while making sure every piece earns its keep. It’s about crafting a spot that’s uniquely yours, while making sure every piece earns its keep.
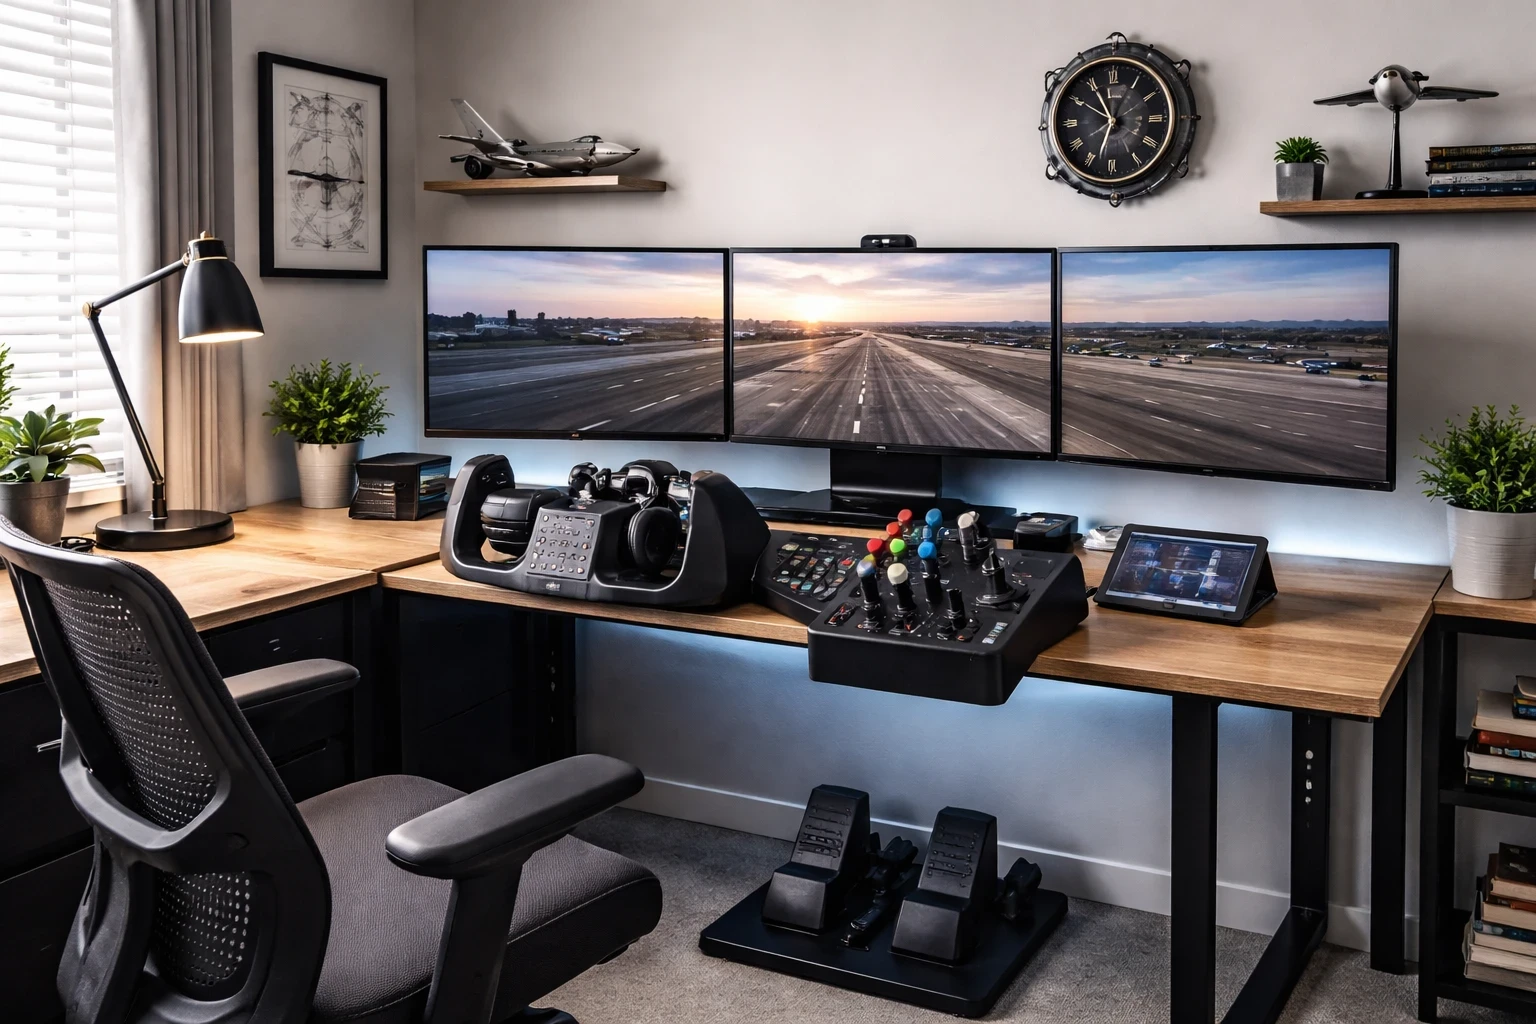
Visual Immersion through Instrument Panels

Instrument panels in a flight sim setup aren’t merely a technical must-have—they’re key to nailing that authentic aviation vibe you crave. Panels like radios, autopilots, and switches add an extra layer of depth and realism to your experience. They bring real-world cockpits into your space, merging technology with decor seamlessly.
Panels can be a bit expensive, but they change how the setup looks and feels right away. Having real buttons and dials in front of you makes it feel closer to an actual cockpit instead of just using a keyboard or mouse.
Mix in some replicas or even retired aircraft panels—these bring a whole new dimension to your setup. Display these alongside your sim-specific instruments to up the wow factor. It’s like bringing a slice of aviation history into your home, marrying the old-school aviation spirit with modern simulation tech. You can also browse real cockpit layouts and instrument references through resources like FAA.
Arranging these panels properly can make or break the vibe. Focus on placing them where they’re easy to see and use without causing clutter. Sometimes just a strategically placed autopilot panel or a radio stack is all you need to turn a corner of your room into a cockpit without sacrificing looks. For more advanced systems like FMC programming and cockpit workflow, this guide is worth checking out: How To Program Your Flight Management Computer – PMDG 737 Tutorial for Beginners.
Building this visual depth not only enhances your sim experience but also lands some serious style points. Friends dropping by will definitely take notice of those sleek panels extending out from your console—no need for additional persuasion.
Enhancing Ambiance with Monitors and VR Integration

Monitors and VR setups are your ticket to sky-high immersion, both visually and experientially. A well-placed ultrawide monitor or a cleverly arranged trio of screens can transform your sim nook into an expansive cockpit view. These displays aren’t just about making the sim look good; they can transform your whole room’s feel.
Ultrawide monitors give you a wider field of view without needing multiple screens. It keeps the setup cleaner while still giving you that immersive outside view. Combine that with a dynamic backdrop of static scenery, displaying aeronautical themes when you’re not flying, and you’ve got an insta facelift for your entire setup.
Bring VR into the mix, and you’re stepping into next-level simming. But hey, no one wants a room full of tangled cords and tech debris scattered everywhere. Use wall mounts or cute VR stands to keep things tidy. It’s neat freak-approved while ensuring that the tech adds to your room’s style rather than overwhelming it. 👉 To explore VR options that work well with flight simulation, you can check this guide: Exploring VR Options For A Next-Level Sim Experience.
Integrating VR without clutter is a balancing act, but it’s worth it for the immersion. Just be sure to have everything organized so you can switch from flatscreen flying to VR adventures with minimal hassle. It’s about making your setup as welcoming and streamlined as possible, while still delivering on that visual ‘wow’ factor. For hardware comparisons and display insights, you can also check Tom’s Hardware.
Think of your setup as a functional art piece that’s always on display. Whether immersed in VR or engrossed in a multi-monitor world, each element contributes to a scene that tells everyone who enters, “Yeah, this is an aviation fan’s haven.”
Elevate the Aesthetic with Subtle Aviation Decor
Flying-themed decor can tie everything together, adding touches that make your setup uniquely yours. Runway charts, aviation posters, and sleek metal artwork can work wonders in hinting at your love for the skies without going overboard.
One thing that can ruin the entire look is poor cable management. Even a clean setup starts to look messy if wires are visible everywhere. Keeping cables tucked away makes a bigger difference than most people expect. Use clips, sleeves, or routing systems that tuck cables away neatly out of sight. A clean setup not only looks good but makes maintenance and trouble-shooting a breeze.
Balance is key. You want your sim area to be functional first—you know, ready for a quick takeoff after a long day. But it should still reflect your love for aviation in a polished way that harmonizes with everyday living spaces.
Mix and match neutral aviation decor and functional sim elements. Welcome subtle hints of your passion without overpowering the room’s overall design. Think of a propeller wall piece or model jet display casually winking at your visitors. It’s all about crafting that charming hybrid space—a retreat that shouts “aviator at heart” with both style and substance.
Bringing It All Together
At the end of the day, building a flight sim setup that doubles as home decor comes down to balance. You don’t need the most expensive gear or a full cockpit build to make your space stand out. What really makes the difference is how everything is arranged, how clean it looks, and how naturally it fits into your environment.
Even a simple setup can look impressive when it’s organized properly, paired with subtle aviation touches, and designed with both function and appearance in mind. Whether you’re working with a small corner or a dedicated room, the goal is the same—create a space that feels comfortable, practical, and visually connected to your interest in aviation.
If you’re looking to improve your setup further, start small. Adjust your layout, clean up cables, or add one or two elements that enhance both usability and appearance. You don’t have to overhaul everything at once.
And if you want to go deeper, explore more guides and ideas on Flight Sim Essentials to refine your setup step by step.